Chocolate Chip Cookies
Hey, all! I figured I trust you enough (yeah right dare to hope) to show you my FAVORITE EVER RECIPE. I love chocolate chip cookies (who doesn’t? And if you say “I don’t”, I MIGHT VIRTUALLY PUNCH YOU!), so I took a recipe that I really like, and improved it (as in, added a secret ingredient). So be prepared for awesomeness!
Ingredients:
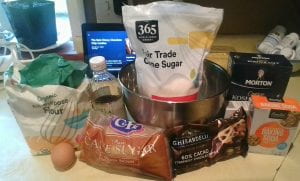
½ cup granulated sugar
¾ cup brown sugar, packed
1 teaspoon salt
½ cup unsalted butter, melted
1 egg
1 teaspoon vanilla extract
1 ¼ cups all-purpose flour
½ teaspoon baking soda
1/3 cup dark chocolate chips
½ cup dark chocolate chips*
1 tablespoon milk
*Don’t mix up the 1/3 and ½ cups, they have special purposes.
Instructions:
In a large bowl, whisk together the sugars, salt, and butter until a paste forms with no lumps.
Whisk in the egg and vanilla, beating until light ribbons fall off the whisk and remain for a short while before falling back into the mixture.
Sift in the flour and baking soda, then fold the mixture with a spatula (Be careful not to overmix, which would cause the gluten in the flour to toughen resulting in cakier cookies).
Fold in the ½ cup chocolate chips, then chill the dough for at least 30 minutes. For a more intense toffee-like flavor and deeper color, chill the dough overnight. The longer the dough rests, the more complex its flavor will be.
Melt the 1/3 cup of chocolate chips on the stovetop or in a microwaveable bowl, being careful not to let it burn. After the dough is finished resting, pour in the melted chocolate and mix it in. Add the milk.
Preheat oven to 350°F (I usually do this about halfway through the 30 minute chilling time, but it’s up to you). Line a baking sheet with parchment paper.
Scoop the dough with an ice-cream scoop onto a parchment paper-lined baking sheet, leaving at least 4 inches (10 cm) of space between cookies and 2 inches (5 cm) of space from the edges of the pan so that the cookies can spread evenly.
Bake for 12-15 minutes, or until the edges have started to barely brown.
Tips:
You don’t have to let it sit for a half hour, but it will be lighter in color and more soft and chewy if you don’t, I prefer the chilling option though.
For the chocolate chips, I usually use the Ghirardelli brand, which you can find at most stores, but if you have a preference, that’s fine, I promise not to judge.
If you want extra flavor, you can sprinkle salt on top of the cookies before you put them in the oven, it just brings out the sweetness a bit more.
If you want to make the cookies look neater, you can gently push down on the top with a spatula or your hand, so they are less tall.
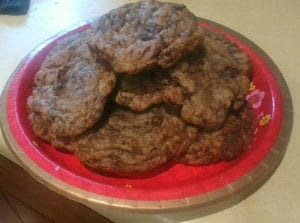
Okay, so I just wanted to let you know that I am totally aware that sometimes the pics of the food doesn’t look so good (the muffins, the muffins!) but I have never been good at getting things fancy, plus I have bad lighting, but I PROMISE it tastes good, so if you decide to try it out, let me know how it works!
-BakerQueen
ishipdrapple
oooooomigosh why did I look at this recipe before breakfast!? This looks so good. Can you bring these to my house please lol.
tiefiter10
Those cookies look good. Nice! 🙂
extremebaker
Your steps are so precise great job!
Mrs. Schutte
I had not realized the extra special step. chocolate. oh my goodness, these sound so decadent. Each cookie is pretty big, yes?
I had not thought about chilling the dough. for pastry and pie dough, I have chilled the dough, but it hadn’t occurred to me for chocolate chip cookies.
Yum!